library(ggplot2); library(ggtext)
ggplot(data.frame(x = c(0,1), y = c(0,1)), aes(x, y)) +
scale_y_continuous(limits = c(0.3, 1)) +
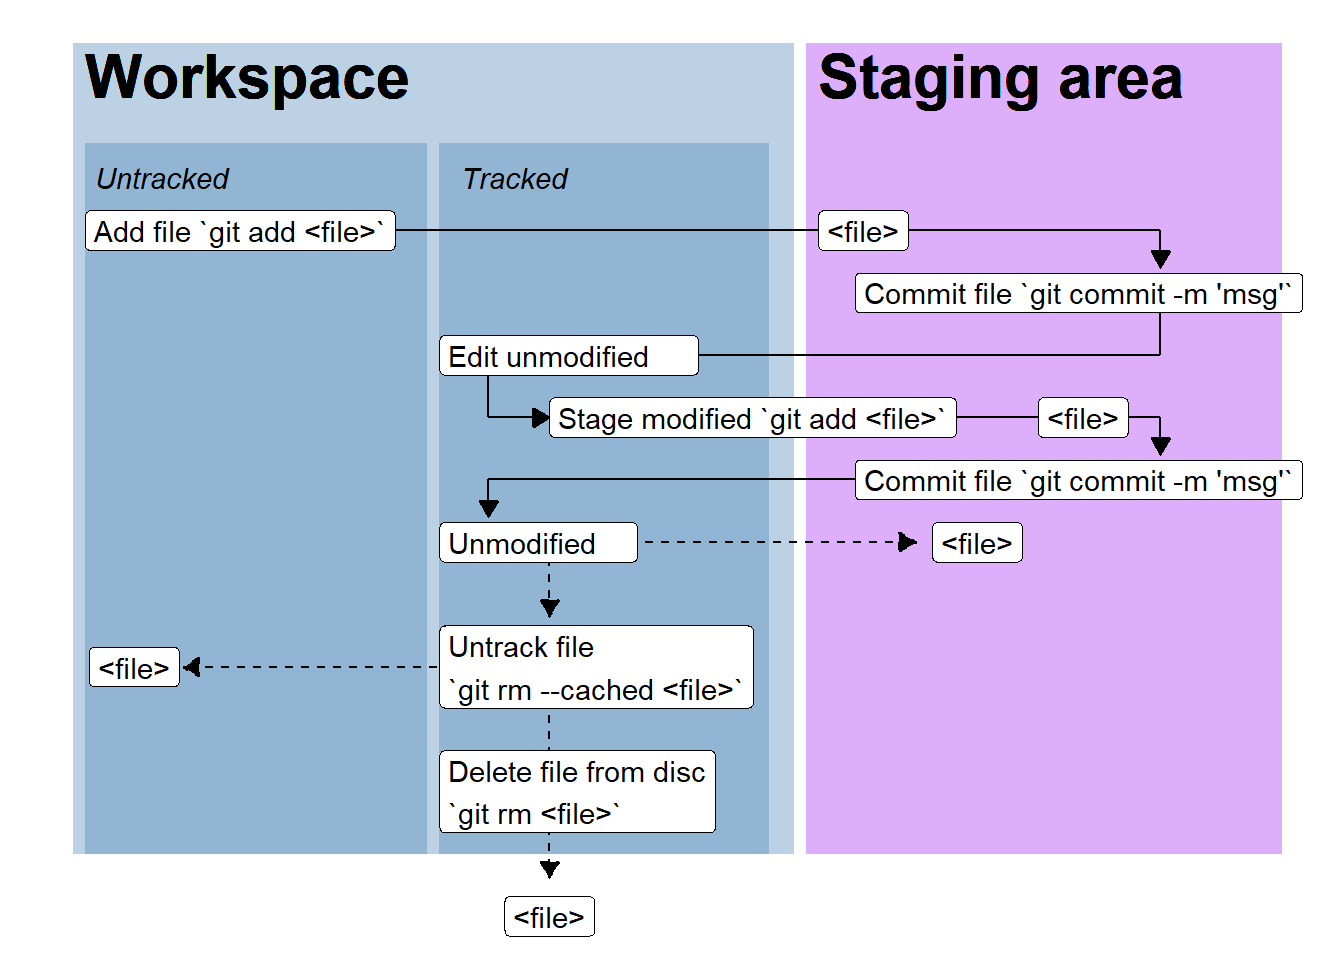
# Workspace
geom_rect(aes(xmin = 0.01,
xmax = 0.6,
ymin = 0.35,
ymax = 1),
fill = "steelblue",
alpha = 0.2) +
geom_rect(aes(xmin = 0.02,
xmax = 0.3,
ymin = 0.35,
ymax = 0.92),
fill = "steelblue",
alpha = 0.2) +
geom_rect(aes(xmin = 0.31,
xmax = 0.58,
ymin = 0.35,
ymax = 0.92),
fill = "steelblue",
alpha = 0.2) +
annotate("richtext",
x = c(0.02, 0.32),
hjust = 0,
y = 0.89,
label = c("*Untracked*", "*Tracked*"),
fill = NA, label.color = NA) +
annotate("richtext",
x = 0.02,
y = 0.97,
label = "**Workspace**",
hjust = 0,
size = 8,
fill = NA, label.color = NA, # remove background and outline
label.padding = grid::unit(rep(0, 4), "pt")) + # remove padding) +
# Stage area
geom_rect(aes(xmin = 0.61,
xmax = 1,
ymin = 0.35,
ymax = 1),
fill = "purple",
alpha = 0.2) +
annotate("richtext",
x = 0.62,
y = 0.97,
label = "**Staging area**",
hjust = 0,
size = 8,
fill = NA, label.color = NA, # remove background and outline
label.padding = grid::unit(rep(0, 4), "pt")) + # remove padding) +
## Labels and arrows
annotate("segment", y = c(0.85, 0.85),
yend = c(0.85, 0.82),
x = c(0.1, 0.9),
xend = c(0.9, 0.9),
arrow = arrow(length = unit(c(0, 2.5), "mm"), type = "closed")) +
geom_label(aes(x = 0.62, y = 0.85 , label = "<file>"),
hjust = 0) +
geom_label(aes(x = 0.02, y = 0.85 , label = "Add file `git add <file>`"),
hjust = 0) +
annotate("segment",
y = c(0.8,0.75),
yend = c(0.75, 0.75),
x = c(0.9,0.9),
xend = c(0.9, 0.48),
arrow = arrow(length = unit(c(0, 2.5), "mm"), type = "closed")) +
annotate("segment",
y = c(0.75, 0.7),
yend = c(0.7, 0.7),
x = c(0.35, 0.35),
xend = c(0.35, 0.4),
arrow = arrow(length = unit(c(0, 2.5), "mm"), type = "closed")) +
geom_label(aes(x = 0.65, y = 0.8 , label = "Commit file `git commit -m 'msg'`"),
hjust = 0) +
geom_label(aes(x = 0.31, y = 0.75 , label = "Edit unmodified "),
hjust = 0) +
annotate("segment",
y = c(0.7, 0.7),
yend = c(0.7, 0.67),
x = c(0.5, 0.9),
xend = c(0.9, 0.9),
arrow = arrow(length = unit(c(0, 2.5), "mm"), type = "closed")) +
geom_label(aes(x = 0.8, y = 0.7 , label = "<file>"),
hjust = 0) +
geom_label(aes(x = 0.40, y = 0.7 , label = "Stage modified `git add <file>`"),
hjust = 0) +
annotate("segment",
y = c(0.65,0.65),
yend = c(0.65, 0.62),
x = c(0.8, 0.35),
xend = c(0.35, 0.35),
arrow = arrow(length = unit(c(0, 2.5), "mm"), type = "closed")) +
geom_label(aes(x = 0.65, y = 0.65 , label = "Commit file `git commit -m 'msg'`"),
hjust = 0) +
## Possible routs from unmodified
## Modify and commit
## Remove (untrack)
annotate("segment",
y = c(0.6, 0.6),
yend = c(0.6, 0.54),
x = c(0.4, 0.4),
xend = c(0.70, 0.4),
lty = 2,
arrow = arrow(length = unit(c(2.5, 2.5), "mm"), type = "closed")) +
## File in staging area
geom_label(aes(x = 0.75, y = 0.6 , label = "<file>"),
hjust = 0.5) +
## Untrack file
annotate("segment",
y = c(0.5),
yend = c(0.5),
x = c(0.4),
xend = c(0.1),
lty = 2,
arrow = arrow(length = unit(c(2.5), "mm"), type = "closed")) +
geom_label(aes(x = 0.31, y = 0.60 , label = "Unmodified "),
hjust = 0) +
## Remove file (delete)
annotate("segment",
y = c(0.5),
yend = c(0.33),
x = c(0.4),
xend = c(0.4),
lty = 2,
arrow = arrow(length = unit(c(2.5), "mm"), type = "closed")) +
annotate("label",
x = 0.31, y = 0.5 ,
label = "Untrack file\n`git rm --cached <file>`",
hjust = 0) +
## File in trash
geom_label(aes(x = 0.4, y = 0.30 , label = "<file>"),
hjust = 0.5) +
## File untracked
geom_label(aes(x = 0.06, y = 0.5 , label = "<file>"),
hjust = 0.5) +
geom_label(aes(x = 0.31, y = 0.40 , label = "Delete file from disc\n`git rm <file>`",
hjust = 0)) +
theme_void()